
Here you will find instructions on how to successfully set up your account in order to streamline communication. These steps are recommended so that you can successfully manage and oversee all the communication leaving your district. These steps will ensure that all communication is branded and engaging, helping you strengthen your brand identity while improving relationships and building trust with your community.
🧑🧑🧒🧒 Step 1: Create Groups and Invite Members
Make managing and overseeing the account simple by creating groups. These could be buildings and principals, Departments and Heads of Departments, or Grade Levels and Grade Leads.
As the owner of your Smore Team, you can oversee all communication via your Management Dashboard.
To create groups, head to the Management Dashboard by clicking on the blue Management Dashboard button on your home page, and open up the Groups Tab.
Simply click on the + Create new group button and name the group. As you continue creating all your groups, you will see a list like below.
Click on Manage Group and then add members to each group by inputting their email address into the invite box.
If your staff are not yet members of the team, they will receive an invite via email or a pop-up in their account.
In Smore, an Administrator refers to a member who also has access to the Management Dashboard of the whole Team or a specific group.
Next to each member’s name, click the three-dot menu to either make them an Administrator or remove them from the group.
Note: You can only make a member an administrator once they have accepted the invite to Smore.
💡 Pro Tips:
- Have at least 1 admin per group so you can delegate the management of each group. Admins will have access to the Group’s Management Dashboard, so they will be able to add and remove members, too!
- Group Admins cannot see the Management Dashboard of the whole team.
- Via the members tab of the Management Dashboard, invite 2 other team members as Administrators to the whole Team. This will help delegate the management of the whole team.
- If you are not creating groups from the get-go, you can add members directly into the Team via the members tab in two ways:
- Input email addresses into the invite box, and they will receive invites via email. You can copy and paste a list from anywhere, and the system will recognize the emails.
- Send all users the magic link, which will add them to the account as soon as they click the link.
🗂️ Step 2: Create shared folders for collaboration
Save time by working collaboratively with your team. Rather than asking colleagues for information that you then need to add to a newsletter yourself, use our Shared Folders feature and add colleagues with Editor permissions. This will give them access to add and edit information in newsletters themselves.
To create Shared Folders, go to your Newsletter Tab and click on + New folder.
Remember to click Create once you have added the name.
You can then add your colleague by clicking on ‘Share this folder’, searching for a specific name in the drop-down.
From the dropdown next to the member’s name, select which permission you want them to have.
To enable them to edit the master copies, set them as Editors. (Editor permissions allow the user to edit, duplicate, and view newsletters in the folder)
When you are ready, click Done.
📂 Step 3: Create a template folder for each group
Send consistent newsletters faster, with less back and forth between collaborators: Make accessing your shared templates as easy as possible for your team by having separate template folders for each group.
Rather than sorting through the templates of all groups, they will be able to find their folder and template within seconds. This will also create an organized archive of all the templates.
To create template folders for each group, follow STEP 2. Add the correct group and set them as ‘Viewers’. (Viewer permissions allow the user to view and duplicate newsletters in the folder.)
💡 Pro Tips:
- Name your folders to be easily identifiable for your team. E.g., Homeroom 2025-2026 templates.
- Within each template folder, assign at least one team member with Editor access to help maintain the templates. You can also assign different permission levels to different team members within the same folder.
™️ Step 4: Create Set Branded Templates for your Team
Set up branded templates that all team members can duplicate and use. Streamlining newsletters across your school or district helps boost engagement. With a consistent brand, message, and structure, families are less likely to miss important updates in their inbox.
To get started, click the Start a Newsletter button in the Editor. From there, you can choose a basic template and begin editing. (All sections of the basic templates are fully customizable.)
You’ll also see a list of your recent newsletters for easy access.
Once you’re in the Editor, you can start customizing your newsletter to match your brand guidelines and mission.
Begin by selecting a design from the dropdown menu. Then, add your logo, choose a background, and update the Header and Title.
To edit the header, simply hover over it and click Edit.
Now that you are ready to create a newsletter, the editor view will allow you to do the following:
- Add your organization logo/mascot.
- Use the drop-down menu to choose a design option.
- Click on Backgrounds, Colors, or Fonts and select an option you like.
- Use the Add Content section to enhance the visuals, increase versatility, and boost engagement in your newsletter.
- If you wish to include a Table of Contents, turn the toggle on.
- Begin listing out the titles in your Table of Contents.
Personalize your header by hovering your cursor over the header section and clicking Edit.
Click on Title under the + Add content box and then select where you want to add it. This will guide your team on what information to include in their newsletter.
When the Table of Contents is toggled on, your Titles will automatically appear on the left.
💡 Pro Tips:
- A consistent structure improves engagement because your audience will know exactly where to find the information they need.
- To save your newsletter template, click Publish—and remember to do this every time before leaving Smore.
-
You can also use the Paragraph widget to add placeholders that guide your team on what type of information to include. Once they duplicate the template, they can edit those sections and remove your instructions.
Hover the cursor over the title or section, and a "+" icon will appear; click on it and the widget panel will launch.
Select Paragraph Widget
Use the Paragraph widget to add placeholders for content. When duplicating the template, the team can edit or delete your instructions.
🗃️ Step 5: Add Newsletters to the Correct Folders
Once your templates are ready, place them in the correct Template Folder so your staff can easily access them.
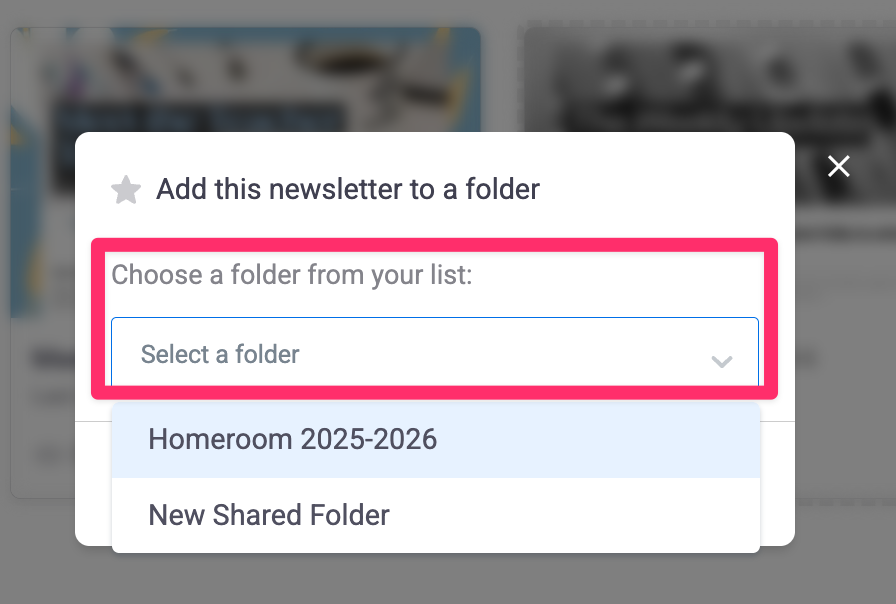
On your My Newsletters page, hover over any newsletter and select Add to Folder. Then, choose the folder name from the dropdown menu and click Add to Folder.
💡 Pro Tip:
Newsletters can be added to multiple folders at once. For example, place one in your team folder for collaboration and in the appropriate template folder for duplication.
Click here to return to the main page.
Need more help? Reach out to support@smore.com!
Comments
0 comments
Article is closed for comments.